Thursday, May 31, 2007

Microsoft Surface Technology Launch

How many of us can imagine do all the computer world works with a touch of screen, maybe we can see it on Minority Report or film only. Nothing is impossible with Microsoft Technologies. Newly, they launch the Microsoft Surface, the first new category in surface computing that "break the traditional barrier between people and technology".

"Break the traditional barrier" here for means all new Microsoft Surface tech is the ability of the technology to recognize physical objects from a paintbrush to a cell phone and allows hands-on, direct control of content such as photos, music and maps. Play your favorite music by just dragging down the song to the player. How our life will be simple after this.

Surface new tech turns an ordinary tabletop into a dynamic surface that provides interaction with all forms of digital content through natural gestures, touch and physical objects. Imagine the image from the digital camera easily can be retrieve just by putting the device on the Surface. Lolz...

But all this technology are at new level, I can wait to see it for my self. More photo below.


via techcrunch


surface1.png

Wednesday, May 30, 2007

How To Create Free Online Storage With Gmail Account

What can we do with new capacity of Gmail account that come with 2.8GB storage capacity. The fact is, now each GMail account comes with a 2.8Gb (will comes more i think) storage capacity but how many among us are actually utilizing it in full.

Here’s I will show just a 1 ways on how you can turn your GMail into an huge 2.8GB online storage. That’s right, a 2.8Gb, if you have only 1 account web storage to keep/retrieve anything you want online simply just by uploading/downloading them. Imagine that you had 2 free Gmail account. Superb free storage...

Step 1. Download Gspace Extension for Firefox


Step 1: Download this nice extension first, actually this is an extension for firefox 
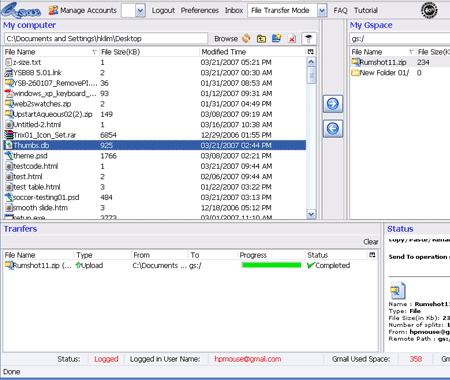
with a interface very similar to FTP application. It comes in 4 different modes (File transfer mode, Player mode, Photo mode, Gmail drive mode), with File transfer mode as default. Here’s how File transfer mode looks like.

If you don't have firefox yet, you can download it here for free

Finished the instalation and you can see this on your computer

  • Top left – My Computer
  • Top right – My Gspace
  • Bottom left – Transfer progress
  • Bottom right – Transfer status

How to Transfer

Select file(s) from Top left (My Computer) and click upload button.

Why it's Hot for me:

* Check your Gmail account with a click only
* Ability to send files to other users
* Handles multiple Gmail Account with just 1 interface


Why it's not hot for me:

* Not a standalone application, only works in Firefox

Try it for your self.

Install Gspace Extension for Firefox / Download Firefox with Google Toolbar.

How To Create Own Chicklet Feed Button

Adding impressive subscriber button on your blog are one of the tips to increase your reader to subscribe your page. Want to had your own chicklet feed button size like this on your blogs. Follow the simple tricks below and you will get your own feed button size.

No needs to install any tools to make it happen just follow my simple step here.


First of all just register your blog at http://www.feedburner.com/ and then follow the instruction below

  1. Click the Publicize tab.

    A list of publicity-related services appears.

  2. Locate and click the Chicklet Chooser service.

    The form shown below loads into the right side of the screen:

    This form contains several options for buttons that promote (and link to) your FeedBurner feed.

  3. Click the radio button next to the button you want to display on your site.

  4. Click the drop-down and select "Blogger" to add the chicklet as a widget.

  5. Blogger will open in a new window. Follow the prompts there to continue to add the new widget.

After that back at your Blogger dashboard and click at Template section> then click on Page Element. There you will find new Subscribe box, click edit on that Subscribe box. The HTML/JavaScript will now open.

The feeds HTML will look like this:

<a href="http://feeds.feedburner.com/TechHackAndCoolGadget" title="Subscribe to my feed" rel="alternate" type="application/rss+xml"><img src="http://www.feedburner.com/fb/images/pub/feed-icon32x32.png" alt="" style="border:0"/></a><a href="http://feeds.feedburner.com/TechHackAndCoolGadget" title="Subscribe to my feed" rel="alternate" type="application/rss+xml">Subscribe in a reader</a>

Find this code:
<img src="http://www.feedburner.com/fb/images/pub/feed-icon32x32.png"

Replace it with:
<img src="http://www.imagefilez.com/out.php/i109997_feedicon96x96copy.jpg">

Now you have make your own chicklet button size 96 X 96.

p/s- My biggest chicklet button.


How To Add Google Adsense Code On Your Top Post Title

How to add Google Adsense code in my new Beta Blogger Blogs...Maybe some of us find it's hard to add the addsense code in new beta blogs. For new beta blogs, adsense code can easily be added on right side bar or in the left side bar with add page element section. Not a problem to us to add the adsense code on that side.

The trick I want to give here is how you can add the adsense code on the main colum above your title post. There is main section where the adds visible to all your reader. Just read the rest and try yes and error for your self but if you do as I meantion here i'm sure you will did it well.

First of all log in into your Blogger dashboard and click at Template section> then click on Edit HTML section. After you click that Edit HTML section the edit template page will come out. Here unchecked the Expand Widget Template box, just scroll down until you find the code for the main colum which is:

<div id="main-wrapper">
<b:section class="main" id="main" maxwidgets="1" showaddelement="no">
<b:widget id="Blog1" locked="false" title="Blog Posts" type="Blog">
</b:widget>
</b:section></div>


When you find these code, replace/change the maxwigets="1" to maxwidgets="2"
Change also the showaddelement="no" to showaddelement="yes"

The new code will look like this:

<div id="main-wrapper">
<b:section class="main" id="main" maxwidgets="2" showaddelement="yes">
<b:widget id="Blog1" locked="false" title="Blog Posts" type="Blog">
</b:widget>
</b:section></div>


Then safe the template.

Now click the Page Element Tab that will open the Add and Arrange Page Elements page. In this section you will see the Blog Post section has a Add Element link above it.

Click that Add a Page Element section and select HTML/JavaScript option, copy your Google Adsense code and paste it there (HTML/JavaScript box). Safe all the changes that you make and preview the change in new window where you can see the Adsense code is now on your top post title.

Also if you want to add other Ad section above or below the post just change the code of maxwidgets="2" to maxwidgets="3" and to the rest prosess your self.

Enjoy your blogging start from now on. Please also tags me if you had other great stuff that can be share with other bloggers.